The first step was to ceate the biped for the Goose. I thought this would be harder to create as it is a more irregular shape as oppose to the Farmer, which resembles the basic biped shape.
The first thing I needed to do was take off the "Arms" of the biped as the goose only has two legs. I then increased the amount of "Neck links". This was to enable me more movability in the neck, which is the main part of the Goose that would be moving. I also added some more "Tail" links to enable me to move around the Tail Feathers of the Goose. I am not sure how much animation will be done with the feathers but I thought they could possibly be used to make the animation look better. The final change I made was to the feet where I added three toes as that is how I had made my Goose.
I then created the Biped with the adjustments made and re-sized, moved and scaled it to fit the body of the Goose. This would obviously have to be adjusted as different parts were moved. I started with the head and the neck and got them placed how I wanted as shown below.

I then worked on getting the "Tail Links" into place. This would enable me to animate the "Tail Feathers" when it came to actually completing the animation. I did this by "Scaling" the links to make them longer.
I then worked on the legs. Scaling, rotating and moving them to make them fit inside the mesh.

The Goose Feet - Edited the toes by rotating and scaling to make them fit the toes.
 One problem that did occur was trying to make sure all the biped fitted into the mesh. The angles of the legs coming off the hips made this very difficult. After speaking to other classmates and the lecturer I was shown an option to solve this. In the object properties of the model there is a tick box for "Renderable". If this is unticked the biped does not actually come through the mesh on the render's but still has the correct animating affect.
This is not recommended on a large scale but I was only using it for very small amounts of the biped that were coming through.

I then started work on the Biped for the Farmer. This was a lot easier as I used the basic biped model for a human. I then just had to move,scale and rotate some of the bones to make them fit.
The Farmer Biped
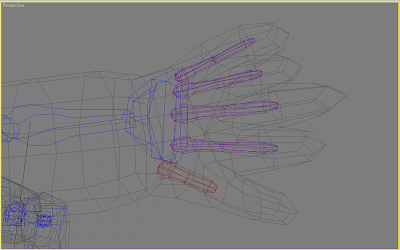
 I did the same for farmer's hand that I had done for Toes of the Goose. I extruded the fingers and rotated them to fit into the mesh of the hand and fingers.


 Final Render of the Farmer - The leather material of the belt and the Eyes are both now properly viewed.


